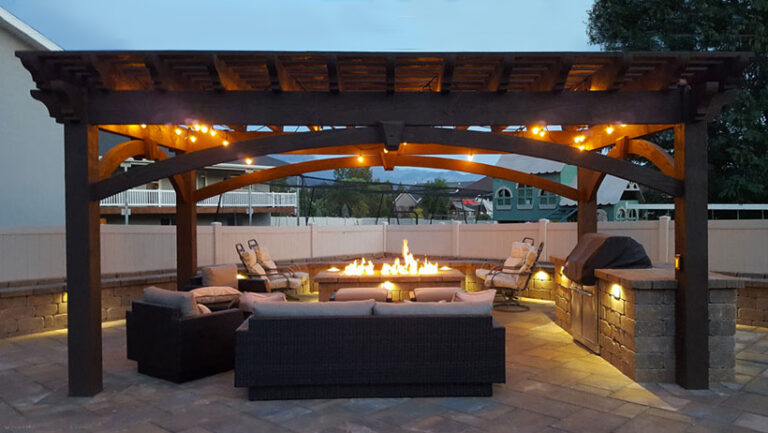
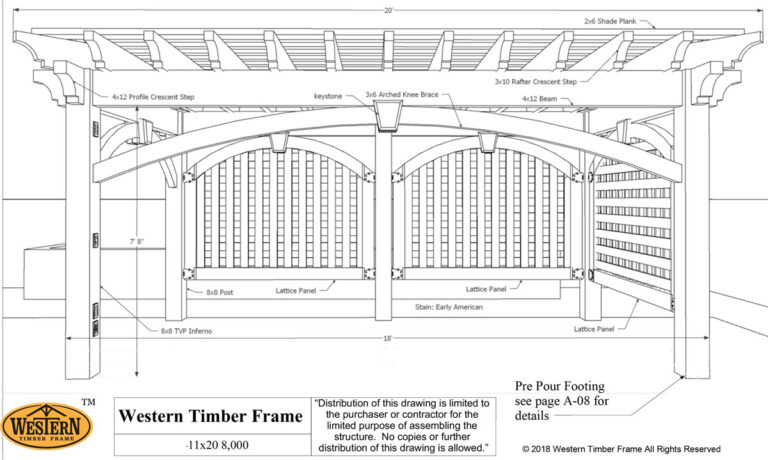
How to Install a DIY Timber Frame Pergola Kit; Knife Plate Layout 4of12

This guide provides more information on installing a DIY Timber Frame Pergola Kit. Once you get your post layout marked like I marked out. This is going to be for an eight inch post so I would mark out eight inches all the way around so that your inside and outside of the posts are marked out. Then we would take the steel and in some cases, aluminum knife plate, These ones are 100% aluminum and is typically what we use. In some cases we will need to use the structural steel.

You will end up just centering it in the post layout mark. Then you can begin to mark for your posts here and eventually put your two red heads, concrete bolts either kitty corner or in a case like this, I would put them here and here.so we are not doing it on the corner of the concrete here.


Once you have got all four post laid out, the next thing you will want to do is to get a height for each post because your concrete is going to have some slope. So we set up the laser here on one corner. We are going to shoot and use that corner as zero and shoot each post and get a height. You will see the laser on the measuring tape and it will go through and shoot the heights for each post.

I’ve created a little map of it and we are going to number each post, one, two, three, four and then make our marks. Marking which marks are 1/4 inch high or 1/4 inch low, whatever it may be. We are going to be cutting off an inch or two per post. Here we have laid out our posts and numbered each one to correlate with then numbers on the the map where the posts are going to go and then we have got this one here that has been drilled for power. So we will end up putting a switch here in the center as well. So keep that in mind and number your posts to correlate with your map that you have made.


Once you’ve got your plate laid out there and centered, go ahead and drill two holes. We wouldn’t need to fill all four. We would do the two holes kitty corner, probably stay away from the corner as much as possible in case the post is being installed right on the edge of the concrete, we would stay away and do the holes kitty corner.
We suggest when you mark out for these knife plates that you can either make a mark with a Sharpee on the concrete and drill or leave your knife plate exactly where it is going to sit and stand on the corner so it doesn’t move as you drill.


How to Install a Timber Frame Pergola Kit; Time Lapse Installation 1/12
How to Install a Timber Frame Pergola Kit; Getting Started 2/12
How to Install a DIY Timber Frame Pergola Kit; Square Up Posts 3/12
How to Install a DIY Timber Frame Pergola Kit; Knife Plate Layout 4/12
How to Install a DIY Timber Frame Pergola Kit; Prep for Posts 5/12
How to Install a DIY Timber Frame Pergola Kit; Setting the Posts & Beams 6/12
How to Install a DIY Timber Frame Pergola Kit; Fasten Beams & Level 7/12
How to Install a DIY Timber Frame Pergola Kit; Setting the Knee Braces 8/12
DIY Timber Frame Pergola Kit; Setting Roof Rafters & Shade Planks 9/12
How to Install a DIY Timber Frame Pergola Kit; Touch Up 10/12
How to Install a DIY Timber Frame Pergola Kit; Attached Pergola 11/12
How to Install a DIY Timber Frame Pergola Kit; Other Notes 12/12
Our project managers can help you design your timber frame pergola kit. Click HERE or Call Today! 877-870-8755